ステートマシンを使わないアニメーションシステム Motion Matching for Unity 導入、解説!
はじめに
この記事は「Unityアセット冬のアドベントカレンダー 2019 Winter」の 12/10 の記事です!
今回、ご紹介するアセットは「Motion Matching for Unity」です。
このアセットは、ステートマシンの複雑なロジックと剛性を使用せずに、ゲームで流動的なキャラクターアニメーションを使用したい人向けです。ただし、結果は、使用可能なリソースのアニメーションデータとコーディング能力によって異なる場合があります。
~ドキュメントより引用~

注意
Unity 2018.4 以降対応
この記事ではUnity 2018.4.6f1で紹介しています。
今回紹介するアセットを運用するには、モーションとプログラミングをある程度知っておく必要があります。
Motion Matching という言葉をご存じでしょうか?
定義はされていないと思いますが、私なりに解釈すると
複数のアニメーションからその場で適切な組み合わせにブレンドするという感じかと思います。。。
よく海外の3Dアクションゲームを見ていてキャラがとても自然なモーションをしていて良いなぁと思っていた際に見つけたアセットを紹介したいと思い記事を作成しました。
導入の仕方
導入手順はドキュメントや動画でもご紹介されていますが
特殊な操作が多く、詰まるポイントがあるため今回軽くご紹介します。
1、パッケージインストール
Motion Matching for Unity を動作させるには下記のパッケージをインストールする必要があります。
注意:「Show preview packages」を有効にしないと出てこないものがあります。
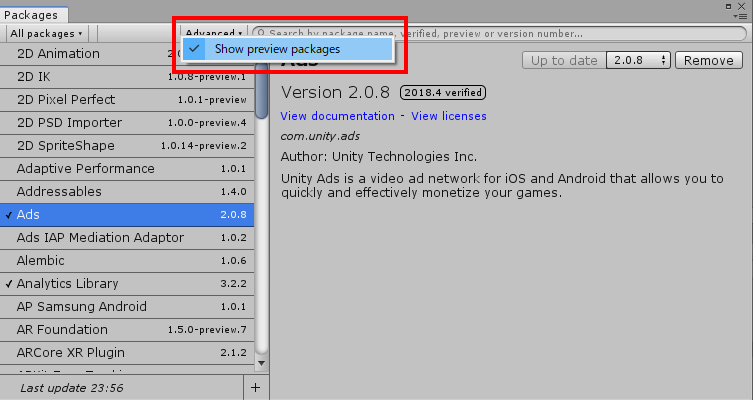
Motion Matching for Unityに必要なパッケージリスト
・Mathematics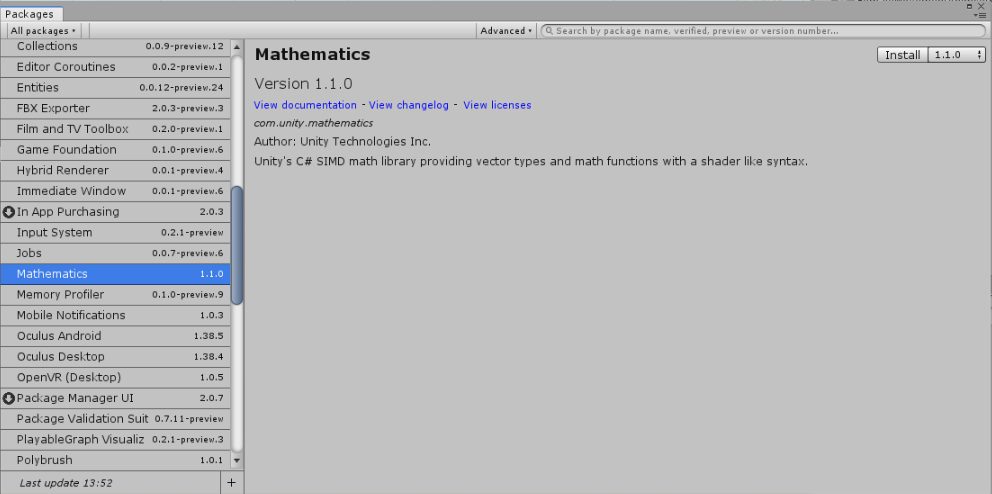 ・Collections
 ・Burst
 ・Jobs (Preview)
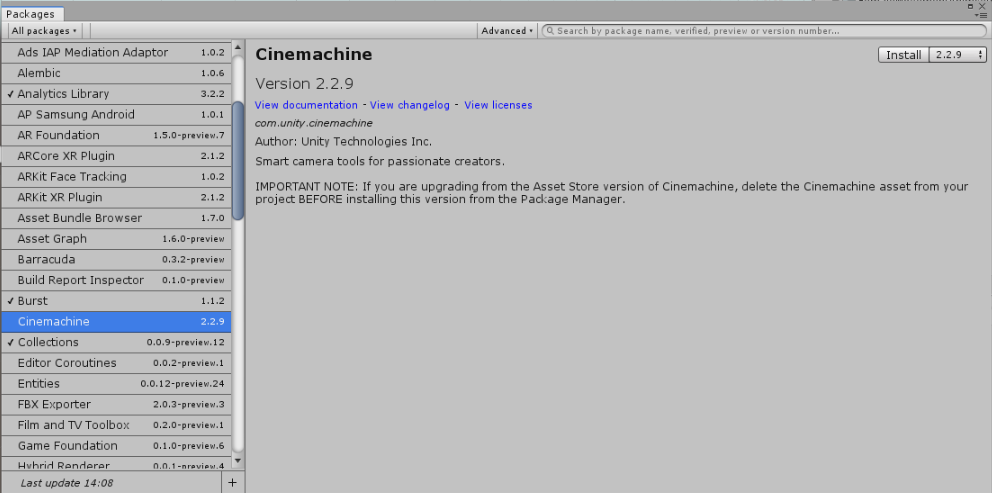
Motion Matching for Unity で必須ではありませんが、
サンプルシーンで使用しているのでインストールしましょう。
・Cinemachine
・PlayableGraph Visualizer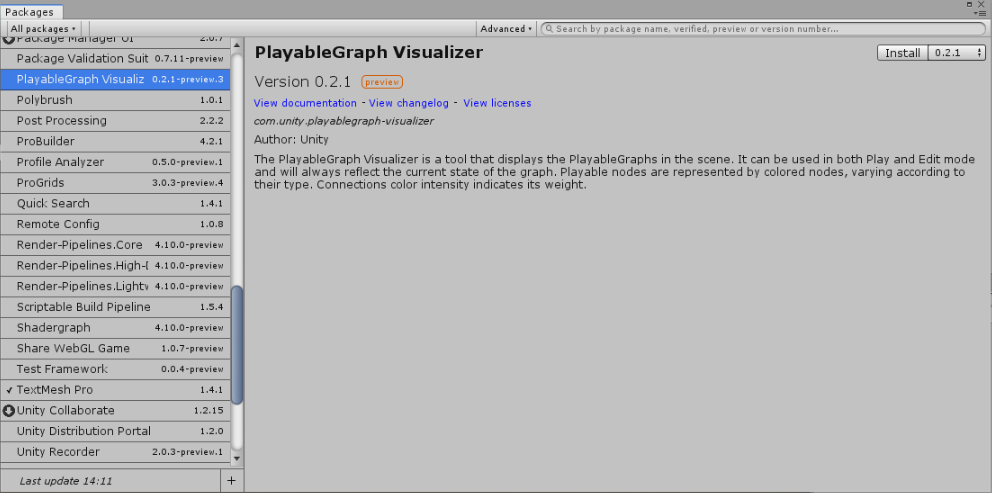
動画では1:04~で解説されています。
https://youtu.be/Y-mCNsDEt6c?t=64
2、サンプルシーン実行
これでもう実行できるのでサンプルシーンを開きましょう!Assets\Plugins\MotionMatching\Demo\Scenes\MxMDemo.scene を実行しましょう。
実際にモーションを使って実践しましょう
ここからは実際に Motion Matching for Unity の機能を使ってみましょう
今回、作成するのは MxMDemo.scene で使用されている移動系の動作です。
紹介する内容はこちらの動画をもとに紹介します。
1、ベースシステムを作成
Assetフォルダ内から「Create」で「MxMPreProcessData」を作成しましょう

「MxMPreProcessData」はキャラクター1人に対してベース部分となります。
ここに様々な設定や機能が入っています。
2、MxMPreProcessData設定
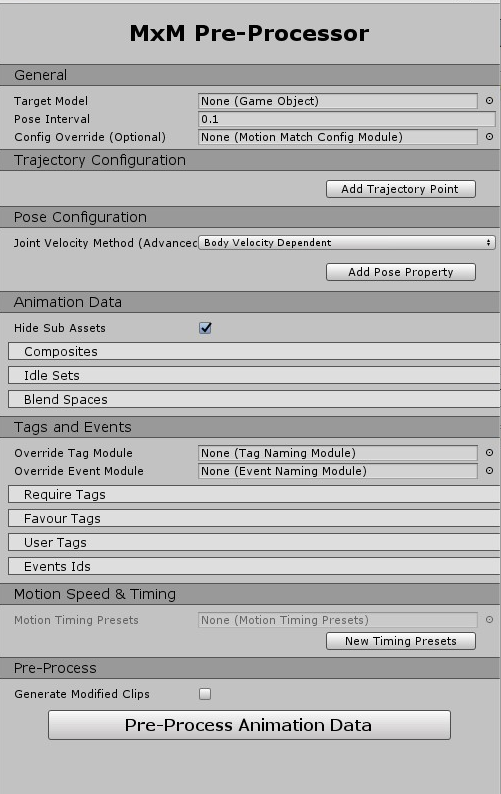
次はこちらのパラメータに設定していきます。
※紹介しない箇所は設定しなくても今回は大丈夫です
~ General ~

・「Target Model」 には動かしたいキャラのベースファイル(fbxモデル等)を設定しましょう。
今回は Assets/Plugins/MotionMatching/Demo/Model/Robot Kyle.fbx を設定しますが、お好みで別のキャラでも構いません。
・「Pose Interval」は各ポーズごとのインターバル時間を入れます。今回は「0.05」を入れます。個人的な目安で言うと動かしたいフレームレートの1フレームあたりの時間を入れると良いかと思います。(30FPSなら0.033等)
~ Trajectory Configuration ~

右下の「Add Trajectory Point」で「Trajectory」を5つ追加します。
ポイントは4~5つ追加して等間隔で時間を指定するのが良いらしいです。
~ Pose Configuration ~
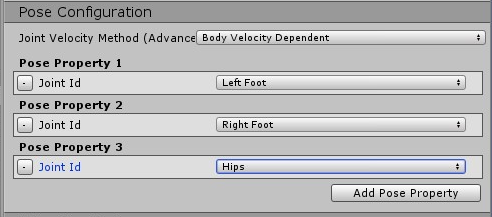
右下の「Add Pose Property」で「Pose Property」を3つ追加します。
それぞれ「Left Foot」「Right Foot」「Hips」を選択します。
ここではモーションで重視したい箇所を選択します、例えば右手に剣を持っている場合は右手を追加すると良いと思います。しかし、追加しすぎるとパフォーマンスに影響がでるため8つまでしか選択できません。
~ Animation Data ~
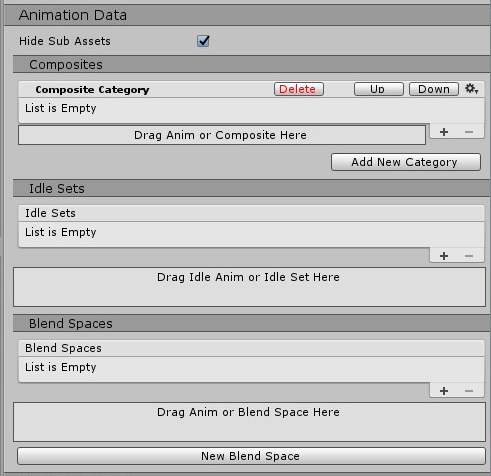
次は実際に使用するアニメーションデータを入れます。
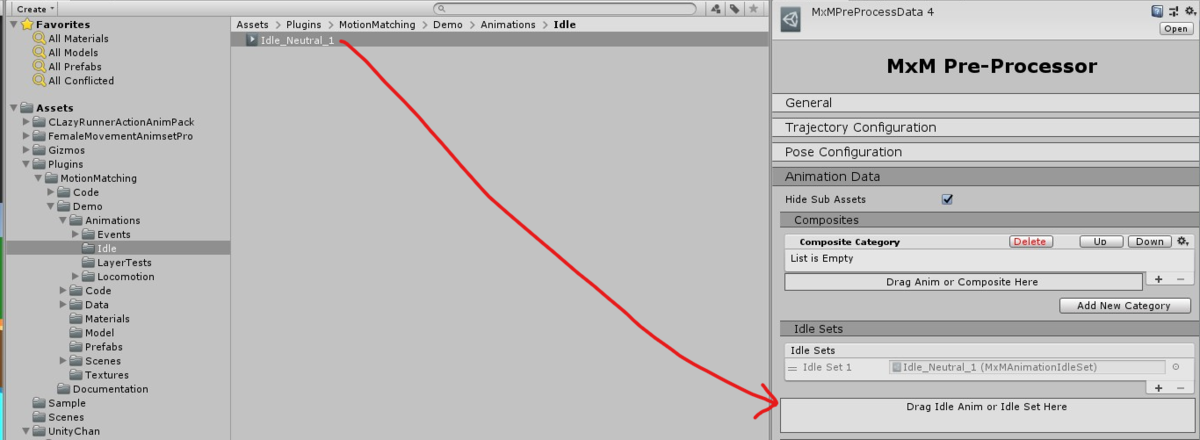
待機モーションを入れます、ドラッグして入れます。
「Assets/Plugins/MotionMatching/Demo/Animations/Idle/Idle_Neutral_1.anim」

次に「Composites」の「Add New Category」で「Walk」「Run」の2つのカテゴリを作成します。

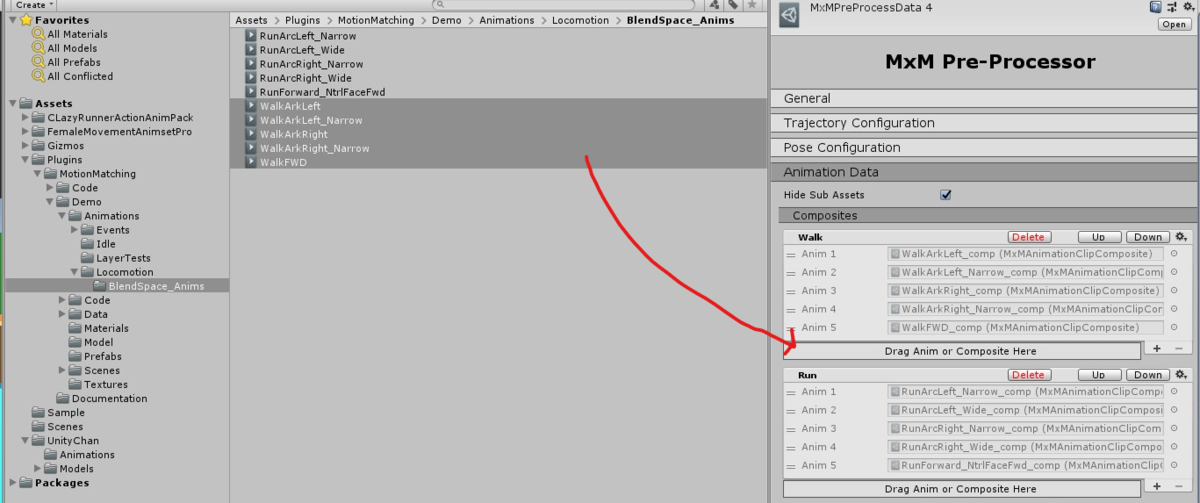


上記は画像でカテゴリに入れるモーションデータを紹介しましたが
下記に文面で記載しておきます。
「Walk」
Assets/Plugins/MotionMatching/Demo/Animations/Locomotion/BlendSpace_Anims/WalkArkLeft.anim
Assets/Plugins/MotionMatching/Demo/Animations/Locomotion/BlendSpace_Anims/WalkArkLeft_Narrow.anim
Assets/Plugins/MotionMatching/Demo/Animations/Locomotion/BlendSpace_Anims/WalkArkRight.anim
Assets/Plugins/MotionMatching/Demo/Animations/Locomotion/BlendSpace_Anims/WalkArkRight_Narrow.anim
Assets/Plugins/MotionMatching/Demo/Animations/Locomotion/BlendSpace_Anims/WalkFWD.anim
Assets/Plugins/MotionMatching/Demo/Animations/Locomotion/Idle2walk_AllAngles.anim
Assets/Plugins/MotionMatching/Demo/Animations/Locomotion/Idle2walk_AllAngles_Right.anim
Assets/Plugins/MotionMatching/Demo/Animations/Locomotion/Idle2walk_AllAngles_Right.anim
「Run」
Assets/Plugins/MotionMatching/Demo/Animations/Locomotion/BlendSpace_Anims/RunArcLeft_Narrow.anim
Assets/Plugins/MotionMatching/Demo/Animations/Locomotion/BlendSpace_Anims/RunArcLeft_Wide.anim
Assets/Plugins/MotionMatching/Demo/Animations/Locomotion/BlendSpace_Anims/RunArcRight_Narrow.anim
Assets/Plugins/MotionMatching/Demo/Animations/Locomotion/BlendSpace_Anims/RunArcRight_Wide.anim
Assets/Plugins/MotionMatching/Demo/Animations/Locomotion/BlendSpace_Anims/RunForward_NtrlFaceFwd.anim
Assets/Plugins/MotionMatching/Demo/Animations/Locomotion/HalfSteps2Idle_PasingLongStepTOIdle.anim
Assets/Plugins/MotionMatching/Demo/Animations/Locomotion/HalfSteps2Idle_PasingLongStepTOIdle_Right.anim
Assets/Plugins/MotionMatching/Demo/Animations/Locomotion/Idle2Run45L.anim
Assets/Plugins/MotionMatching/Demo/Animations/Locomotion/Idle2Run45R.anim
Assets/Plugins/MotionMatching/Demo/Animations/Locomotion/Idle2Run90L.anim
Assets/Plugins/MotionMatching/Demo/Animations/Locomotion/Idle2Run90R.anim
Assets/Plugins/MotionMatching/Demo/Animations/Locomotion/Idle2Run135L.anim
Assets/Plugins/MotionMatching/Demo/Animations/Locomotion/Idle2Run135R.anim
Assets/Plugins/MotionMatching/Demo/Animations/Locomotion/Idle2Run180L.anim
Assets/Plugins/MotionMatching/Demo/Animations/Locomotion/Idle2Run180R.anim
Assets/Plugins/MotionMatching/Demo/Animations/Locomotion/JogForwardTurnLeft_NtrlMedium.anim
Assets/Plugins/MotionMatching/Demo/Animations/Locomotion/JogForwardTurnRight_NtrlMedium.anim
Assets/Plugins/MotionMatching/Demo/Animations/Locomotion/PlantNTurn90_Run_L.anim
Assets/Plugins/MotionMatching/Demo/Animations/Locomotion/PlantNTurn90_Run_R.anim
Assets/Plugins/MotionMatching/Demo/Animations/Locomotion/PlantNTurn135_Run_L.anim
Assets/Plugins/MotionMatching/Demo/Animations/Locomotion/PlantNTurn135_Run_R.anim
Assets/Plugins/MotionMatching/Demo/Animations/Locomotion/PlantNTurn180_Run_L_2.anim
Assets/Plugins/MotionMatching/Demo/Animations/Locomotion/PlantNTurn180_Run_R_2.anim
Assets/Plugins/MotionMatching/Demo/Animations/Locomotion/Run_LedgeStop2_Idle.anim
Assets/Plugins/MotionMatching/Demo/Animations/Locomotion/Run_LedgeStop_Idle.anim
Assets/Plugins/MotionMatching/Demo/Animations/Locomotion/RunForwardStart.anim
Assets/Plugins/MotionMatching/Demo/Animations/Locomotion/RunFwdStop.anim
今回、カテゴリ分けする必要性は薄いですが、今後の運用でこのようにカテゴリをわけしておくととても運用がしやすいです。
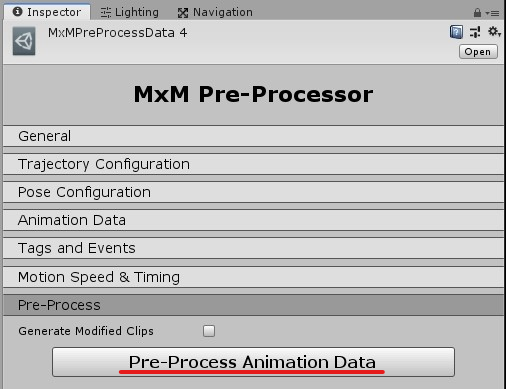
MxMPreProcessData設定の最後に「Pre-Process Animation Data」で統合されたアニメーションデータを書き出します。
保存する場所やファイル名はとくに指定はありません。
もし、今後モーションを追加したり削除する場合は MxMPreProcessData を調整して書き出す感じになります。
3、Scene にキャラを作成

MxMPreProcessData設定の General で設定した「Target Model」をScene上に配置します。

Scene上に配置したキャラに Add Component で「MxMTrajectoryGenerator」を追加します。
追加した際に「MxM Animator」も一緒に付くので、「MxM Animator」の「AnimationData」に「Pre-Process Animation Data」で書き出したアニメーションデータを入れます。
これで完了です!

※障害物を貫通していますが、更に手順が必要なためこれで正解です
もっと活用するには
今回、機能の最初の部分しか紹介しきれませんでしたが、具体的な活用方法等はYouTubeのチャンネルにて公開していただいています!
最後に
Motion Matching for Unity の紹介動画が早いペースで上がってきていて
Discordで積極的に意見交換しているようなので今後のアップデートに期待できます!
明日は 汗人柱 さんの「【冬のアドカレ2019】unityでオープンワールド型ゲーム開発!GTAっぽい世界作りが捗るアセットまとめ(CyberWeekセールは12月14日 17時まで) - Unity AssetStoreまとめ」です!